How to Take a Visa Photo at Home (Master Guide)
How to Take a Visa Photo at Home (Master Guide) — सरकारी दूतावास नियमों के अनुसार फोटो बनाएं, रिजेक्शन चेक करें और 300 DPI में डाउनलोड करें।
The definitive 10-step master manual for capturing a fully compliant biometric visa or passport photograph at home. From room lighting and camera distance to facial expression and pixel formatting, learn the exact protocol required to pass consular and online portal scrutiny. [हिन्दी दिशा-निर्देश]: How to Take a Visa Photo at Home (Master Guide) के लिए आधिकारिक मानकों के अनुरूप फोटो फ्रेमिंग करें, चेहरे के अनुपात की पुष्टि करें और उच्च रेजोल्यूशन में सीधे डाउनलोड करें।
How to Take a Visa Photo at Home: Complete Master Guide
A step-by-step master workflow for capturing an embassy-compliant biometric portrait.
Step 1: Prepare the Room & Lighting
Daylight provides the most balanced, shadow-free illumination. Avoid single overhead lights that create shadows beneath your eyes and nose.
Face natural daylight from a window; illuminate both sides of the face evenly.
Do not use direct flash close to the face or rely on harsh single ceiling bulbs.
Ready to Create or Check Your Photo?
Apply these guidelines immediately using our automated client-side processing tool.
Top 5 Consular Photo Rules • दूतावास रिजेक्शन से बचने के 5 नियम
फोटो खिंचवाते समय चश्मा उतार दें; लेंस की चमक से बायोमेट्रिक स्कैनर फेल होता है।
मुंह पूरी तरह बंद रखें, दोनों होंठ मिले होने चाहिए और चेहरा न्यूट्रल (शांत) रखें।
दीवार से 1.5 मीटर आगे खड़े हों ताकि सिर या कानों के पीछे परछाई न पड़े।
किसी दूसरे व्यक्ति से आंखों की सीध में 1.5 से 2 मीटर दूरी से फोटो खिंचवाएं।
ठुड्डी से सिर तक का हिस्सा सरकारी पैमाने के अनुसार होना अनिवार्य है।
हमारा टूल फोटो को सही पिक्सेल और 300 DPI पर एक्सपोर्ट करता है।
The 10-Step Visa Photo Preparation Protocol
फोटो तैयार करने के आसान कदम
- •1. Prepare the Room: Choose a well-lit space facing an open window with a plain white or light wall.
- •2. Position the Subject: Stand 2 to 3 feet in front of the wall to eliminate background silhouettes.
- •3. Set the Camera: Mount camera or phone on a tripod or have a friend hold it 5–6 feet away at eye level.
- •4. Adjust the Lighting: Ensure balanced daylight on both sides of the face with no overhead bulb glare.
- •5. Wardrobe Check: Wear dark everyday clothing that contrasts with the white background; no uniforms.
- •6. Posture & Expression: Face camera squarely with shoulders relaxed, eyes level, mouth gently closed.
- •7. Take Continuous Burst Shots: Capture 10–15 photos to select the optimal neutral eye-level frame.
- •8. Verify Specifications: Measure chin-to-crown height and horizontal eye line against target embassy rules.
- •9. Crop & Resize: Use our automated workstation to crop to exact millimetres or pixel dimensions.
- •10. Compress & Export: Ensure file weight is under portal limits (e.g. 240 KB for DS-160, 300 KB for e-Visa).
Camera Positioning & Preventing Lens Distortion at Home
जरूरी दिशा-निर्देश व जानकारी
Position your camera lens exactly at eye level, roughly 1.5 to 2.0 meters (5 to 6.5 feet) away from the subject. Standing too close causes wide-angle barrel distortion (the "fisheye" effect), which unnaturally enlarges the nose and shrinks the ears, violating consular facial geometry specifications.
Visual Biometric Composition & Schematics
बायोमेट्रिक फ्रेमिंग गाइड व तकनीकी निरीक्षण
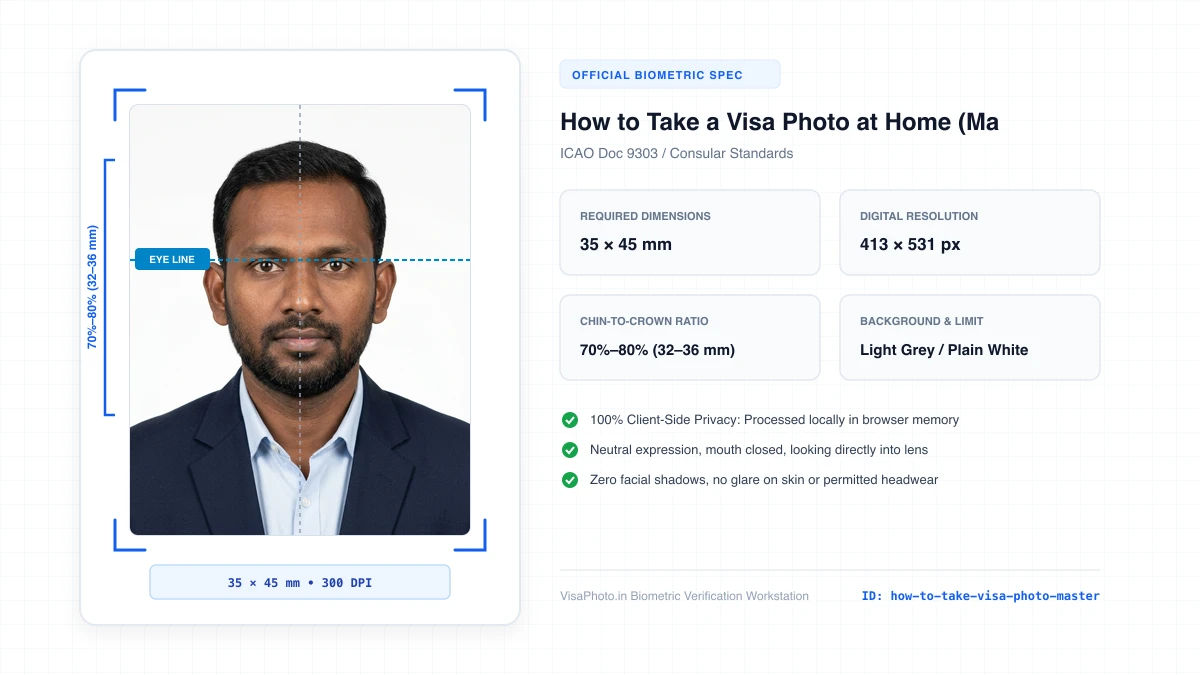
How to Take a Visa Photo at Home Master Guide
Visual guide showing the complete 10-step visa photo process
Official Government Authority Sources
All requirement specifications are sourced directly from official gazettes and immigration portals.
What How to Take a Visa Photo at Home (Master Guide) Can and Cannot Verify
हमारी तकनीकी गारंटी और निष्पक्ष पारदर्शिता
VisaPhoto.in maintains complete transparency. We ensure your photograph matches published mathematical and optical specifications, but we never make false claims of consular authority.
- ✓Exact Dimensions: सटीक साइज (mm, इंच) और 300 DPI रेजोल्यूशन।
- ✓Target File Limit: 240 KB या 300 KB के अंदर सुरक्षित कंप्रेशन।
- ✓Biometric Ratios: चेहरे (70%–80%) और आंखों की बिल्कुल सही सीध।
- ✓Background Uniformity: बैकग्राउंड का सही रंग (सफेद या हल्का ग्रे)।
- !Visa Approvals: वीजा अप्रूवल का अंतिम निर्णय दूतावास के हाथ में होता है।
- !Photo Recency: फोटो 6 महीने से ज्यादा पुरानी नहीं होनी चाहिए।
- !Physical Identity: फोटो में आवेदक की असली पहचान स्पष्ट होनी चाहिए।
Frequently Asked Questions
अक्सर पूछे जाने वाले सवाल व आधिकारिक जवाब
Related Biometric Tools & Compliance Guides
अन्य उपयोगी वीजा टूल्स व देश गाइड